Tuesday, April 16, 2013

Makeup for Beginners - Basic Inexpensive Makeup Brushes

Even if you are just starting out in makeup, it's essential to have great tools that will help you to perfect any look. You can get away with using cheaper makeup products if you have efficient brushes that will do the work for you well. A great quality brush is a one time investment, so don't hesitate spending money on a good makeup brush. At a beginner level in makeup, there's no need for tons of makeup brushes, rather some basic, multi-task ones which will be in your makeup kit for many years. I'm not a big fan of starter brush kits because they tend to always lack of some basic brushes.


Foundation Brush (optional)

You can simply use your fingers for applying foundation, makeup artists tend to use fingers for a natural application. However, if you have a stick foundation or other more consistent foundations you might want to use a foundation brush.
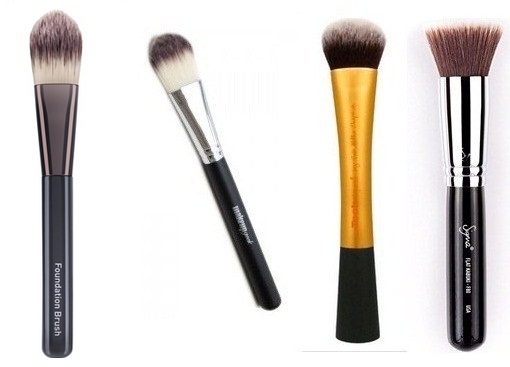

No7 Foundation Brush £14 

MakeupGeek Flat Foundation Brush $7.99

Real Techniques Expert Face Brush $9 (recommended)

Sigma Beauty F80 Flat Kabuki $18


Face Brush

You only need one multi-task brush to apply powder, blush and bronzer. The brush should definitely be soft, dense and not bigger than a blush brush in size. You should be able to apply blush and contour and powder with it (only for powder-based products).


MAC 109 Small Contour Brush $35 (recommended)

Sigma Beauty F05 Small Contour Brush $16

MakeupGeek Blush Brush $8.99


Angled Eyebrow Brush

It's a small brush with dense bristles cut on an angle which is best to use to fill in the little gaps in your eyebrows with a shadow. If you prefer using a brow pencil, you can skip this brush.


MakeupGeek Brow Brush Duo $4.49 (recommended)

Sigma Beauty E75 Angled Brow $12

Bdellium Tools Studio Line Double Ended Brow Lash Brush $14.17


Flat Eyeshadow Brush

The most basic eyeshadow brush that is used to apply eyeshadow on the eyelids wet or dry. Make sure the size of the brush fits your eyes; it covers your lid space and doesn't go beyond the crease.

Real Techniques Shading Brush $6 (recommended)

Sigma Beauty E55 Eye Shading Brush $10

MAC 239 Eye Shader Brush $25


Blending Brush

It's a soft, fluffy dome brush with long bristles used to shade and blend eyeshadows, for crease work and even to buff in under eye concealer.


MAC 217 Blending Brush $23 (recommended)

Sigma Beauty E25 Blending Brush $10

MakeupGeek Stiff Dome Brush $7.99

Bdellium Tools Pink Bamboo Blending Brush $12 


Detail Brush

Another multi-task brush that is able to do detail work because it gets into smaller areas of the face. It's a soft, tiny brush with dense bristles curved to a point. Best to use for smuding eyeshadow on the lower lashline, highlighting the tear dot or even concealing smaller blemishes.


MakeupGeek Eyeliner Smudge Brush $4.49 (recommended)

No7 Smokey Eye Brush £7.25

                          Bdellium Tools Pink Bamboo Smokey Eyeliner Brush $9.95

                                                 Sigma Beauty E30 Pencil Brush $10


Links: 
MAC click
Real Techniques click (US)
MakeupGeek  click
Sigma click
Bdellium Tools click
Cocktail Cosmetics (worldwide) click for Bdellium Tools, Sigma, Real Techniques

Sunday, April 14, 2013

Makeup for Beginners: How To Start Wearing Makeup

Makeup is such a feminine and fun way to enhance your natural beauty. It takes a lot of practice to master all the skills needed as well as the observational knowledge you pick up by experience. I honestly believe that in order to become a good makeup artist for yourself you need to practice, observe and take in as much information as you can. 


PRACTISE!

For beginners, experimenting with makeup is a very good starting point. You don't necessarily need tons of products to do that, the key is to practice on yourself. You first have to learn for yourself what works for you. Study your face and see what are your best features - you might have a pretty even skintone, nice cheekbones, a great lip shape and so on. Learn to see your natural beauty and enhance those features. Also, think about how much makeup is needed for you to still feel comfortable in your skin (within your time frame).  

MAKE MISTAKES!

Don't be discouraged if you make mistakes. Mistakes help you to improve. Every time you make a mistake you learn a new lesson about make up. You need to experience what's not working to see what works. Use your face as a canvas and your skills will continue to improve. 


OBSERVE!

YouTube offers numerous tutorial videos to help you guide through the world of make up artistry. However, I can't stress it enough that in order to learn the tricks of the trade you need to listen to ONLY the professional / working, well-experienced make up artists who possess all the skills and knowledge to educate others. Every single day there's a new YouTube "make up guru" emerging and obviously make up is an art form, but their skills and knowledge leaves a lot to be desired. Make up is individual-oriented; you cannot just recreate a  look without adopting it to your face, and most people need correction work on their eyes and lips anyway. If you want to watch educational make up videos Lisa Eldridge, Wayne Goss, MakeupGeek, Pixiwoo are some of those with incredible skills and knowledge.  

STUDY!

If you are really interested in make up artistry, you can find tons of books in this subject. One of my personal recommendations would be Bobbi Brown's Makeup Manual which explains to you everything about the skin, the face, the eyes, the lips, the equipment and so on.


BEGINNER PRODUCTS

As a beginner, you don't need that many products to start practising. I included mostly drugstore, inexpensive products to which everyone has access to. No brushes are needed.


Tinted Moisturizer

Maybelline Dream Fresh BB Cream, L'oréal Magic Skin Beautifier BB Cream,  No7 Beautiful Skin BB Cream

I want to exclude foundation in the beginning because finding the right shade, type and texture of foundation is not easy for a beginner. If you really want to start wearing foundation, then take your time, don't buy the first foundation that is offered to you, keep searching, do research, consult a specialist. 

Please read my How to choose the right shade of foundation post as a start, which is the same for TM. Whether you use foundation or a tinted moisturizer apply them with your fingers; see what coverage you need, how your skin feels and how the foundation performs and wears throughout the day. Start with a small amount from the middle of your face and move outwards where you tend to need less coverage. Keep on practicing!


Eye primer


Eye primers or eyeshadow bases are used on the lids before the eye product application in order to stop the eye products from creasing, to make the shadows last longer and to bring out the real intensity of the colors. If you choose not to get an eye primer, then simply apply your concealer on the eye lids as well.

Urban Decay Eyeshadow Primer Potion, Nars Smudge proof Eyeshadow Base, Too Faced Shadow Insurance


I listed some cheaper alternatives, but in this case I'd recommend you buying the high-quality ones, because as long as you have a great eye primer, even the cheapest eyeshadows will show up on your eyes. You only need to apply a tiny bit of the product before eyeshadow or cream shadow. 
FYI: eye primers are still quite new on the market, therefore there isn't a wide variety of them available at the drugstores.

NYX HD Eyeshadow Base, Avon Eyeshadow Base, Elf Mineral Eyeshadow Primer, Artdeco Eyeshadow Base


Cream Eyeshadow

Maybelline Eye Studio Color Tattoo 24HR Cream Gel Shadow

The Color Tattoo cream gel eyeshadows are so gorgeous and so easy to use. This range includes very modern, soft and very easy- to- blend colors. 


Use a primer underneath to prevent creasing and smudging. You don't need a brush, just simply apply the color with a finger onto your eyelids.  Go for the bronze, gold, grey, and plum colors for natural looks and for darker skintones and more colorful looks try the purple and teal colors. You can also use them as eyeliners.


Mascara and Eyelash Curler

L'oréal Volume Million Lashes, L'oréal Voluminous, Maybelline Colossal, Max  Factor False  Lash Effect, Max Factor 2000 Calorie

You can get a cheap eyelash curler from your local drugstore and you will immediately see that it's a fantastic product. Might look scary at first, but it really opens up your eyes. Place it to the roots of your lashes, press together and hold it for 5 seconds, then let it go, move a little further up and hold again for 5 more seconds. 

Mascara is a must have and the drugstore ones are just as good as the expensive ones. You can buy lengthening, volumizing, thickening mascaras, it all depends on what effect you would like to have. After you curled your lashes, start from the lashline and move side to side  with the wand as you move upwards.

Eyeliner
L'oréal Carbon Black Intense Eye Pencil, NYX  Slide-On Eyepencil,  Maybelline  Line Express

First you should get a black and a brown eyeliner and then go on and try different colors. Go for the creamier eyeliners which are more forgiving and glide easier. Start lining your eyes at the roots of your lashes and keep practising until you can draw a quite thin line (you can always thicken it later). You can also line the inner waterline which really defines your eyes. If you have a brown eyeliner that is a shade lighter than your eyebrow color, you can also use it as a brow pencil to accentuate your brows. Don't try to draw a brow, fill in the small gaps instead.


Lipstick and Lipgloss

Rimmel Kate Moss Lipsticks
We skip blush because if you have a creamy lipstick you can also use it as a cream blush. Apply a tiny amount of lipstick with your finger onto the apples of your cheeks and blend it towards the ears. You can always add more but it's harder to take the excess off.

Rimmel Colorstay Lipgloss, NYX Megashine Lipgloss, L'oréal Glam Shine Lipgloss

As a beginner, you can apply your lipstick or lipgloss straight from the tube. Try a pink, coral, plum, brown or red lip product and see what you like best. At first pick a color that is similar to your natural lipcolor and then keep on experimenting. Bright colors look very flattering on darker skintones, fair and medium skintones should go for less intense colors.

Tuesday, February 26, 2013

What's my skin type?


As for me, I used to find it difficult to answer such an easy question: What's your skin type? 
The condition of your skin - though it's genetically coded, changes quite often due to many factors that affect your life. If you eat unhealthy, consume too much sugar, drink less water, sleep less, become stressed, take medicine just to mention some problems that will show up on your skin. However, your skin type is a constant state your skin is in and is essential to know in order to find the best cosmetic treatment and products intended for your skin.


Normal Skin

It's neither dry nor oily. You have an even skin complexion, there is no discoloration on you face. Your skin has no pimples, blackheads, and pores are barely visible. The skin feels smooth, elastic, and does not get flaky. Basically, you don't really have any problems with your skin.


Dry Skin (Dehydrated Skin, Combination Skin)

Obviously your skin feels dry and often tight and flaky; especially after you take a shower. Your skin lacks moisture and is a bit droopy. Your skin color is a bit dull and not even in color; you might have some red patches. Your skin might also be sensitive to irritation. Pores are visible and pimples and blackheads do appear on your face. Unfortunately, dry skin is more prone to aging, so fine lines are apparent.

You might have an oily T-zone and dry cheeks which means you not only have dry, but also dehydrated skin. Dehydrated skin is what's also known as combination skin.

Tip: Exfoliate twice a week and go for alcohol-free toners and cleansers. Use a heavy and hydrating moisturizer that seals in moisture well. If your T-zone tends to get oily, use an oil-free, lightweight moisturizer in that area. You might also want to invest into a humidifier.


Oily Skin

We talk about oily skin when the whole face is oily. That means it's greasy and shiny due to the overproduction of sebaceous glands. Your skin is very much prone to blackheads and pimples. Pores are large and visible. Your skin has an unpleasant feel to it and might also have an unpleasant smell. But to say something nice about this skin type too, your skin is less likely to show signs of aging.

Tip: Use hydrating cosmetic products formulated for oily skin. Exfoliate regularly and use an oil-free moisturizer. Include only oil-free products in your make up kit. 


Sensitive Skin

It's not really a skin type, but rather a skin condition. You have one of the three skin types listed above, and sensitivity in your skin as an extra. Sensitive skin is thin, dry and tight. You tend to have a lot of redness due to irritation. You might also be sensitive to certain ingredients in cosmetic products that cause itchiness and often a burning feel. Your skin has fine pores and pimples are also present.

Tip: Go for cosmetic products formulated for sensitive skin and choose natural, hypoallergenic products that lack of perfume and preservatory ingredients. 


Problematic Skin

Again, it's a skin condition in which your skin is prone to acne and often gets flaky whether you have dry or oily skin. 

Tip: The best cure is prevention; if you have the right treatments your skin will show improvement (exfoliation, facials, etc...).Consult with a dermatologist or your beautician for the required treatments.

Sunday, February 10, 2013

How to pick the right foundation shade


There are three things you need to take into consideration when you are in search of a foundation:

1) SKIN TYPE
the foundation formula and texture you choose should reflect your skin type

Normal Skin


If you have good skin to start with you can use a tinted moisturizer only that gives a light coverage and a sheer finish.

Normal skin can pull off both matte and luminizing foundations including liquid foundations, cream foundation, stick and compact foundations for normal skin.


Dry Skin


Hydrating liquid and cream foundation formulas work best for dry skin. You should look for foundations with emollients and water-binding agents (Glycerin, Hyaluronic acid, Lecithin) with the ability to promote the retention of water. 

Glycerin is a humectant that attracts water from the lower layers of the skin and help to seal in moisture.

Hyaluronic Acid boosts skin's moisture content and prevents moisture loss.

Lecithin is an emollient which softens and soothes the skin and also
seals in moisture.


Combination Skin
Combination skin is a term often used mistakenly for dehydrated skin. If you have an oily T-zone and dry cheeks, you have dehydrated skin.

For this skintype, you need hydrating foundations with water-binding properties.

Whipped foundations are also good for balancing out the skin. 


Oily Skin


Obviously you need matte, oil-free foundation or oil-absorbing properties in the foundation such as Silica which soaks up the oil from the skin.


Mature Skin


High coverage foundation is a big NO-NO! The more layers of foundation you put on attempting to hide wrinkles, the older you look. You want to give back the luminosity to your skin, not piling up for a cakey face.

You should avoid matte and powdery foundations, instead going for liquid foundations while using a good face primer that will prepare the face and fill in the wrinkles beforehand.

Cosmetic ingredients such as AHA (Alpha Hydroxy Acid), BHA, Retinol and Peptides are beneficial due to their exfoliating properties and for collagen production. 


2) COLOR

Once you found the right formula, then you look for the right shade. 
The most important thing is to test out the foundation. You can bring little empty pots with you to the store and fill them with different shades of the tester foundations, or you can ask for samples. However, make sure you test the foundation in natural daylight, not in artificial light at the store. 


Where do you test foundation?

You always check your neck and declate (chest) area for the right shade of foundation.


The color of your face is not even all over and when your face is darker than your neck it looks like a mask. Start by eliminating those shades that are total mismatch (f.i.: light colors on dark skin).

Warm and cool tones


Foundations come in warm and cool tones regarding the face. If you have more yellow in your skin, you  have a warm undertone, while if you have more red and pink then you are cool-toned.  If you're prone to redness, then check your forehead and your chin to decide.
Accordingly, the general foundation shades are either pink-based or yellow-based.


Then in the "Bobbi Brown way" test the shade that seems a perfect match with the neck on the side of your face, with a shade lighter and a shade darker for comparison. Gently blend and see which color blends in perfectly with the neck.


3) COVERAGE

Foundation is meant to even out and beautify the skin, and to cover minor imperfections! The emphasis is on minor; foundation is not a concealer, it isn't meant to cover blemishes.
The coverage level depends on the condition of your skin and your personal preference.
Coverage is not about the texture because liquid foundations can have as high coverage as stick foundations. (Stick foundations can replace concealers because of their pigment concentration) 

Unless you have to go down the red carpet looking flawless, you don't really need high-coverage foundations. You can decide on having a sheer or matte finish on your skin, but as I see it, foundation should look like skin, so a more natural-looking, lightweight foundation looks great on everyone at any age.

Some examples:

Light/Sheer Coverage: Chanel Vitalumiére Aqua

Medium Coverages: L'oréal True Match, Neutrogena Healthy Skin, Bourjois Healthy Mix, Make Up Forever HD

Full Coverage: Revlon Colorstay, Estée Lauder Double Wear


BEFORE FOUNDATION


Always prepare the skin by using a moisturizer (especially with dry skin). 

Face primers provide a great base for foundation and make it long-wearing. It is advised to use the face primer from the same brand as of the foundation. 


TOOLS
Beautyblender sponge, No7 Foundation brush, Real Techniques Stippling brush


Foundation can be applied with fingers, foundation brushes and sponges.


Again, it's a question of preference. Make sure you use a small amount of foundation at a time and blend it well into the skin. You can always add more, but with foundation it's also true that less is more!

Monday, January 21, 2013

Great Heat Protectants for Hair

Have you ever noticed how frequently we apply heat to our hair? Unless we use heat protectants, we damage our hair every time we blow dry it, straighten it, or style it with a curling iron. The typical consequences of heat-damaged hair are split ends and hair breakage. In addition, using heat styling tools on wet hair is a definite DON'T of hair styling.

Hair can naturally protect itself from heat if it's rich in moisture. Using hair treatment products such as conditioners, oils, hair masks, or serums keep the hair moisturized, therefore, prevents the hair from heat damage as well.

Heat protectants are typically spray mists with their main ingredient being silicone. When you apply heat to your hair silicone acts as a barrier between your hair and the heat. Any product with a high silicone level does a great job for heat-resistance. Heat protectants are best to be spritzed into the hair when it's wet, then distributed equally by a comb.

My product recommendations for heat protection are:


TRESemmé Thermal Creations Heat Tamer Protective Spray ($4.99)

AMAZING ONE!!!!


It's a 10 Miracle Leave-In Product ($17.99 at Target)


GHD Heat Protect Spray ($16)


Where to get: ghdhair, lookfantastic.com, Amazon

Wednesday, January 16, 2013

2012 SKINCARE FAVORITES


Facial Products


AVON Planet Spa Face Masks (available from the magazine)


I love the whole AVON Planet Spa Face Mask line; my absolute favorites are the ones above. They're easily and quickly applied and work wonders in 10-20 minutes.

African Shea Butter Nourishing Face Mask: really warms up the skin, perfect for winter time. Shea butter highly moisturizes and nourishes the skin and absorbs into the skin very quickly.

Mediterranean Olive Oil Hydrating Face Mask: a real treat for the skin, hydrates and refreshes really well. I also love the smell!

Thailand Lotus Flower Deep Pore Cleansing Face Mask: amazing one for really deep cleansing the pores and always gives my skin that refreshed feel.

Dead Sea Minerals Facial Mud Mask: I call it the Avatar face mask :) it is a mud mask that deep- cleanses, refreshes, and hydrates the skin at the same time.


Body Shop Tea Tree Skin Clearing Lotion (for blemished skin)


No wonder it's a best-selling product, it is amazing! It's a unique non-oily lotion that lightly moisturizes, cleanses, and refreshes the skin. The main ingredient is the tea tree which is beneficial for blemished skin. Before applying makeup, I apply a thin layer of the lotion which immediately starts cooling down and cleansing the skin. It absorbs quickly and leaves my skin feeling refreshed and really smooth. Can't get enough of it!


This is a milky body scrub; a gentle and mild exfoliator with such small particles that I tend to rather use the scrub on my face. It contains 200 ml (6.7 fl. oz.) which is a descent amount for a face/body scrub. I really like the Rice Milk & Vanilla one which is a moisturizing scrub; Greenland uses organic ingredients and selects  different types of milk for their conditioning properties (Rice Milk, Almond Milk, Coconut Milk) in their scrubs. 


 Body Products


Garnier lotions are my all time favorites; this new gel cream formula absorbs very quickly and hydrates the skin very well. 


The best hand cream I've ever come across. The cream instantly absorbs into the the skin and deeply moisturizes it. Perfect for everyone with extra dry skin as well.


Hair Products


This year's favorite shampoo for me has to be Pantene Aqua Light Virtually No Weight shampoo. I have quite oily roots and my hair really favors the texture of this shampoo. I use it together with the spray conditioner from the same line which gives daily moisture to my hair.


It's a fantastic leave-in treatment oil that always soften my hair and gives it a super soft feel. Massage one or two pumps of the oil into wet or dry hair, but leave out the roots.

Monday, January 7, 2013

You are what you eat

Beautiful, glowing skin cannot be attained without a healthy lifestyle which includes healthy nutrition and regular exercise. Why is nutrition so important for skincare? Well, new skin cells replace the dead cells on the surface of the skin, and a diet rich with vitamins and minerals promote the growth of new skin cells (Brown, B.).

The reason why actual food is a better source for vitamins than pills is because pills contain single, isolated nutrients (Brown, B.). Let's take a look at what vitamins do our bodies crave for?


Vitamin A


An antidioxidant which promotes the growth and renewal of new skin cells and prevents aging (Brown, B.).

Can be found in carrots, tomatoes, spinach, broccoli, egg yolk and melon.


Vitamin B complex


B complex is a group of water-soluble, interdependent vitamins which increase the number of fatty acids in the skin; therefore, promotes exfoliation and firmness  (Brown, B.).

Can be found in liver, fish, poultry, yeast, brown rice, beans, pees, eggs.


Vitamin C

As an antioxidant, it reduces the appearance of hyperpigmentation that is needed for even skintone and is a building block of collagen  (Brown, B.), hence promotes firmness. The body is not able to produce or store Vitamin C, so it's essential to take in food that is high in Vitamin C.

Can be found in most fruits and vegetables especially berries, kiwi, orange, mango, pepper, tomato, broccoli.


Vitamin D


Vitamin D helps our bodies to absorb calcium which is essential for our bones to grow. As for the skin, it helps with the development of skin cells (Brown, B.).
Our bodies naturally produce Vitamin D after exposure to the sun, however, over-exposure to the sun can lead to serious skin damage, hyperpigmentation and premature aging.

Can be found in dairy products such as milk, yogurt, cheese. 


Vitamin E


 Vitamin E is one of the most powerful antidioxidants and is also known as THE beauty vitamin. It helps build and maintain healthy skin tissue  (Brown, B.) and protects our skin against the environmental threats, as well as contains a natural SPF of 3 (Brown, B.). It is also beneficial in healing processes, while our bodies don't produce it on their own.

Can be found in avocado, nuts, seeds, leafy greens and vegetable oils.


Water


Our bodies are made up of  about 80% of water and it can't be emphasized enough how incredibly important water is to our bodies. If our skin is not hydrated, our skin will become super dry. 
Water also flushes out all the unwanted toxins from our bodies. 

It is recommended by health experts that we should drink at least 8-10 glasses of water every single day to maintain our health. 

Plenty of fruits such as watermelon, strawberry, lime, apricot, apple, and vegetables such as cucumber, tomato, celery, carrot has a high level of water content (source: smartlivingnetwork.com).


Sources:
Makeup Manual by Bobbi Brown $32   Amazing book on which I relied for this post.
General medical information from MedlinePlus
SmartLivingNetwork